Saturday, May 14, 2011

garage sales and patio stuff.

So we've hit up a few garage sales here and there this year, but today was the official kickoff of the season with the annual Lakeland Hills community sale. Community sales are the best cos you can hit lots of houses with minimal effort. Too many in this community in fact. But it was a rocking good day - sunny and sixties and unexpected (was supposed to be rain) and quite literally one of the first sales we drove up to (glad I took Stuart!) I got a pressure washer for $20 and an 8' Werner fiberglass ladder for $5 (we later saw that same ladder today at a store for $100) -

Sweet. And another $5 burr grinder -

Awesome. Some more speakers for $5, a 24-hub switch for $2 (though not gigabit, but thanks to Leopard's crap nonsense I'm stuck in 100x speeds until I likely downgrade all of our Macs back to Tiger - quickly becoming IMO the last great Mac OS but I digress ... ) and some other stuff.

We had Stuart properly filled - we hit up the new Pick Quick location for lunch before trucking it back home.

And then I got to work in the garage putting together a quick mockup of my new patio cover design. After finding a lumber outlet in Tacoma (Trevor got all the lumber for his fence there last year) that sells cedar for the same price as crap treated stuff, I moved to an all-cedar design. And because I can't get über-cheap cedar in lots of dimensions (and to keep this from being über-expensive) I had to redesign my plan a bit. I knew I would. It's what I do.

So in keeping with my fondness for multiple depths to designs, I am using 4x4 cedar posts for the six vertical supports I'll pour cement footing for and then tacking on 1x6s (that I'm ripping an inch off so they only stick out 1/2" from each side of the 4x4) to give the posts some dimension.

But backing up some - I also found a guy here in town that sells cedar directly from a mill out of his driveway so I hit him up for some samples more or less on a handshake that I'd be back for more. He had the 1x6s and 2x4s which I am thinking of using for the overhead beams. So I cut and ripped this stuff down today and put it together.

First had to cut the notch for where the 4x4s will cross each other - took a circ saw set to a depth of 1-3/4" (half the depth of a 4x4) and hacked across each 4x4 with cuts set about 3/4" apart (the width of my chisel - which I've since bought a wider one) by just moving my trusty speed square I was using as a guide -


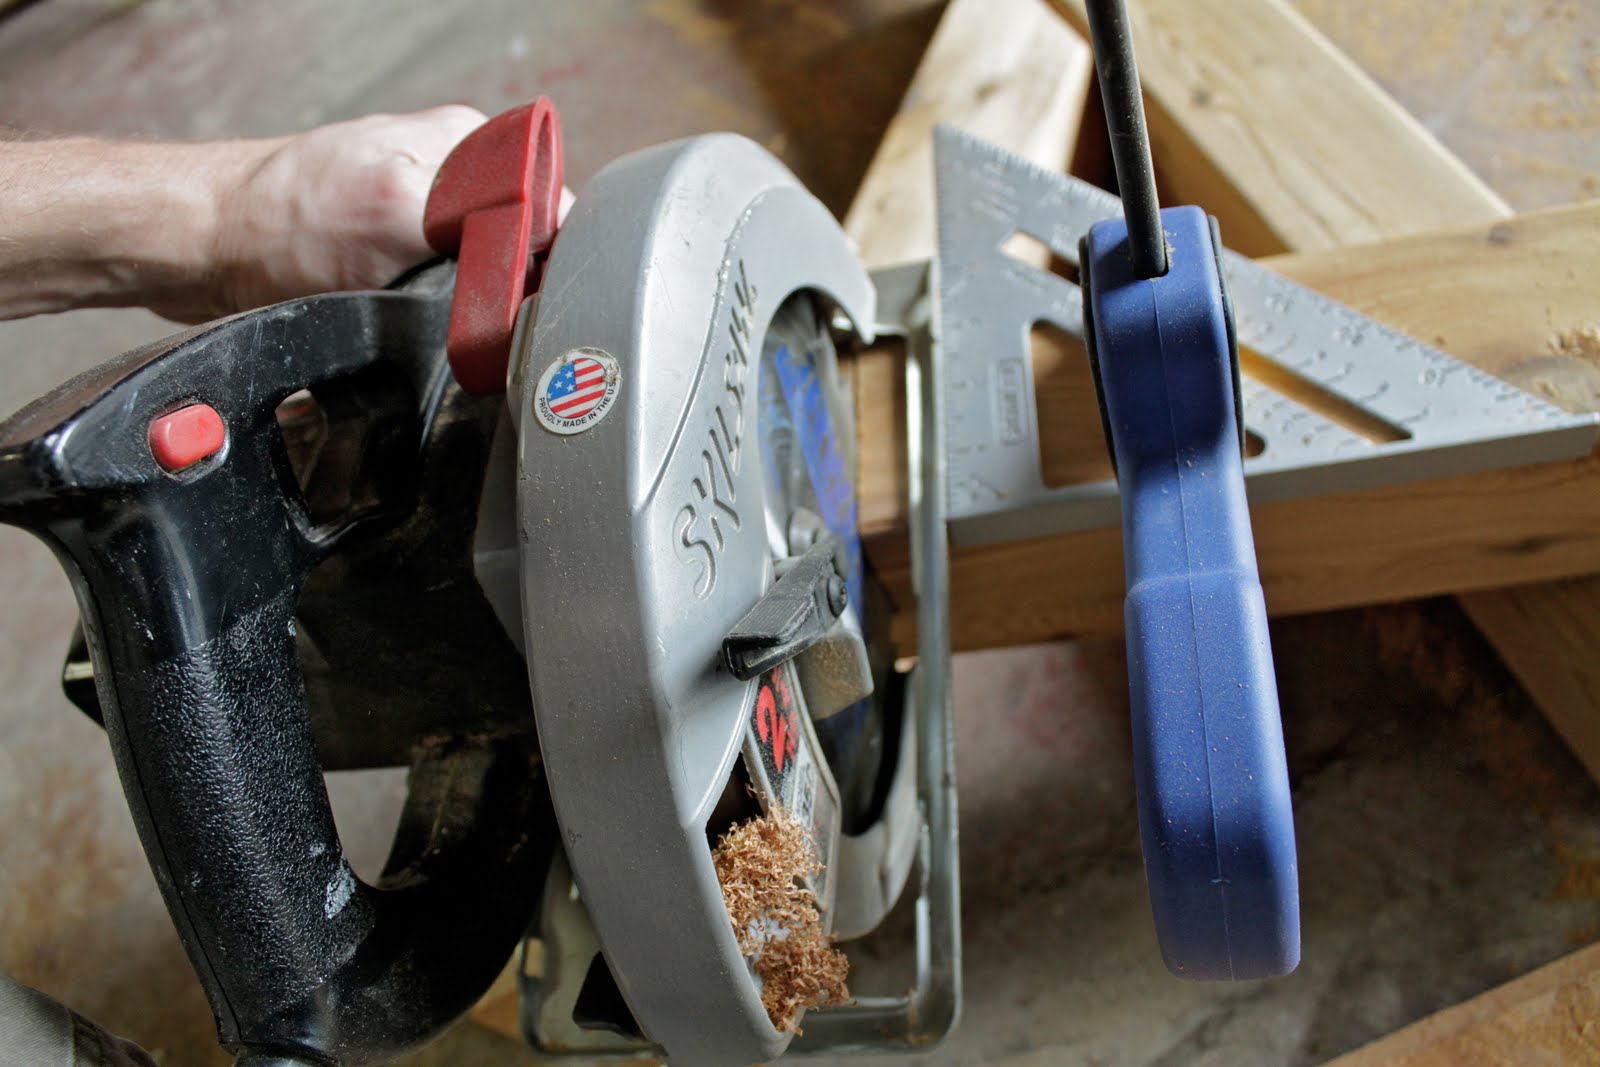
Then it was a simple matter of chiseling out the scraps -

times two and - wallah - intersecting 4x4s -

Then I quick tacked on the 1x6 that I had ripped to 1x5 -

and tested out the stain I had leftover from doing the cedar shakes in the porch gable last year (the nice custom mix that the guy at Mclendons made up for me that I'll have to get to mix me up another gallon) -

I'm afraid the dimensions of the wood I'm using are going to yield a patio cover that looks sort of tiny (such as no 4x8s or 4x6s - of which that one I was using as a sample had lots of) and only 2x4s as the cross beams (instead of 4x6s) - which is why I wanted to put together this little mockup - to check the scale of it in real-life as opposed to the sketches I have worked up.

But - those larger dimensions would probably make this patio cover exponentially more expensive (like that guy could order me 2x4x16s from the mill but the price goes from $4 for a 2x4x8 to $1.50/lin ft or $24 vs. $8 for two 8-foot sections connected in the middle multiplied by sixteen which is how many cross beams I have designed to use). And 4x6 or 4x8 cedar posts would probably be quite expensive as well - and not sure where I'd find them.

And - as I am now - keeping in mind the fact I am going to be moving at some point in the relatively near future ... no sense in going overboard. Spending the money instead on some nice patio furniture and a gas heater that I can take with me to my next house ... and hoping it'll look good anyway with the garage finished, some Christmas lights looped around it and hanging out on warm summer evenings.

Time to buy some lumber.

Monday, May 2, 2011

patio.

So we had our first really nice weather weekend these last two days and that, well, makes me want to work on stuff outside. So yeah - the bathroom sits, still mostly gutted, waiting for ... I'm not sure what.

But now - like I was out of nowhere completely random about building new stair railings and the subsequent complete painting of my house - I am motivated on something just as ridiculous ... putting in the back patio and then - building a patio cover over it.

I know - I should be doing a lot of other things. The garage overhaul will also for-sure come this summer. But during the month of May I'm now thinking I will spend it finishing the backyard landscaping and, well, putting in a patio and such.

So once I put in the two front sidewalks using a combination of 6x6 and 6x9 cement pavers, I realized it (like most - er, all - of this remodeling business) ain't rocket science and decided at once to use the same pavers for the patio I've been planning for something like four years = since I had the yard tore out, regraded and planted anew. Which is just to say at that time I measured out the 12x20' space that would become the patio and didn't plant any seeds so ... it turned into a 12x20' weed garden. Good times.

But that just say I've had this plan for a while now and it's time to act on it. Building the patio will be easy, if not a bit back-breaking but hopefully all-in-all not terrible. It'll take a truckload (or two) of sand from the landscaping place I pick up my mulch and now stones. And a truckload (or two) of pavers from the Depot (haven't been able to find them anywhere else). Removing a lot of weeds and leveling the whole two-hundred-and-forty square feet before dumping in the sand. Tamping it all down then starting to insert the pavers. One. At. A. Time.

It'll be tons of fun, but it'll look nice (hopefully) when it's done. Then the real fun will start ... building a patio cover.

Luckily - like the space - I've had a plan in mind for years based off this random structure in the middle of a parking lot at a nearby elementary school. Yeah, I have no idea why it's there but the first time I saw it I remember thinking 'that would make a cool patio cover.' And so today I biked over there with my camera to take some detailed photos of how it was put together, then with a tape measure and some graph paper to sketch out all the measurements and dimensions so I could figure out how much lumber I would need.


Yikes - that's a lot of lumber ... must find a place to get cheap - ideally recycled - lumber.

And a couple notes to self -

- run an electrical conduit from the garage to one of the posts and put in a double-gang outlet - for Christmas lights, the charcoal lighter and the iPod dock or something
- build the plans from knockoffwood for the chaise lounges
- incorporate a clothesline on the patio cover
- put in a fruit/vegetable garden in the strip between the patio and the garage

Monday, April 11, 2011

just some photos of a particularly cool sunset.

So just some photos ... the other week, as the sun set the light got all mad-crazy and despite not being somewhere amazing like of course surrounded by mountains still just on my front porch it was pretty cool.


landscaping.

Well this weekend has been pretty busy. Let's see ... Saturday ...

After forgetting I put my wallet in Katie's purse and having to drive to Tacoma and interrupt her girls' lunch at the Harmon to grab it, I then had to haul it all the way back to the awesome Toyota salvage yard in good ol' Buckley to pick up a set of original alloy rims for Stuart. Yeah, I've never been a fan of his 'mudders' as Trevor called them (never knew big, fat obnoxious truck wheels had a name, but there it is), the two back ones had a constant slow leak, the tread on all of them was pretty much past the end of their life and I just wanted to be rid of them. So Stuart got a makeover -


He was excited. Now he feels more like a normal, cool old-school Toyota truck instead of some pimped-out thing.

And this also meant I got to experience (for the first time) the land of the used tire business. Yeah, there was no way I was buying new tires for Stuart (just did that exciting business for Spencer). So off to find a used tire place I went yesterday afternoon. They seem to be everywhere so it must be a thriving industry. Makes sense, I guess.

So anyways, I found one right here in town (umm, no surprise there really) and hit them up for a set of four 175/75R15s (cash only of course) ... of which he had a couple piles out back. After scrounging through them, we gathered four (uhh, one ended up having a gash in it - had to go back and select another from the lot) and whisked them around to get the water out. Good times. Then he mounted and balanced them - dumped them in a tub of water to check for leaks (one had a leak - had to seal it up) and about an hour later I was off to install them myself.

So after probably another hour and having to drag out at least half a dozen tools to get one of the hub caps from the chrome mudders off (including a sawzall armed with a metal blade), Stuart had four new feet and was all happy. So was I.

Oh - and I had also run over with him to the local landscaping yard to pick out half a yard of rock. The plan has been for awhile now to get some and make borders around all my flower beds. Last fall, while waiting for the bulldozer driver to come around - I noticed they sold a lot of crushed rock options of which one in particular I thought would make a nice border.

So I finally hit it up yesterday and had the guy dump in half a yard of rock. Whoa - Stuart's suspension was like 'hurry home and unload this stuff!' Which I did.

So then today it was landscaping time. And for which I thought I was properly dressed -

Complete with Mountain Hardware 3/4 pants and my beloved Tretorn Strålas (no, seriously those boots are awesome for yard work) that I found rummaging through the clearance racks at REI ... I was at it.

Had no idea what I was doing of course, but it couldn't be that hard. Afterall, I've put in an entirely new yard and laid two sidewalks so this should be a piece of cake.

Well, it started off slow as I figured out what to do. First, used my flat shovel to cut away the grass, then a skinny one to peel it out and toss it in Trevor's wheelbarrow (mine was full of the rocks I had got) -

The biggest pain was the edging I discovered I had stashed up high on a shelf in my garage - the stuff was impossible to bend and get into shape (I ran out, so a trip to Mclendon's produced better edging and another box of spikes) but I figured out to jam the spikes through it to get it to stay better -

Then I threw in some strips of the über-weed cloth to hopefully keep weeds from growing up in the rocks -

Then tossed in the rocks, flattened and spread them out by running the shovel across them and ... wallah -


Rock borders. So next then is the bed in the back of the house of which now is a pretty big mess (though thanks Katie for weeding it the other week). I planted some heather last week but it needs an overhaul, along with the rock edge treatment -

Then there is a bed all along the south side of the house, in the front where the trees are, one on the side and another surrounding the back corner. So a lot more landscaping to do this spring/summer. Hopefully to include putting in the back patio (which will be the same cement pavers I used for the two front sidewalks).

Oh and in that second-to-last photo (the one of the front of the house), the screens I built last weekend are up (all the windows now have screens - I used the idea I came up with last fall to build them).

Now just bring on the warm weather so I can open the flippin' windows!

Monday, March 21, 2011

audio stuff again.

So it's baseball season again - Julian's first practice is Saturday. Which meant a trip to the local Goodwill to try to find some cleats that he'll wear for two months, trash and outgrow. So after finding him some and while Katie perused the clothes looking for a good find or two, J and I wandered around the aisles mostly just for fun - like, to make fun of the circ saw that someone had spliced a plug onto the cable and then wrapped with electrical tape. Yeah - I trust that thing won't short out and kill me.

But amongst the 19" CRT televisions and CD changers circa 1998 I saw a Klipsch subwoofer. $39.99. There was an outlet nearby so I plugged it in and turned it on - worked. Well, at least it turned on. But both speaker surrounds were good (it has an 8" woofer coupled with a 10" passive radiator on the back) so I hemmed and hawed - then finally plunked down the forty bucks and took it home to see if it would actually work.

Well - it did.

Downloaded the manual (although hooking it up to my Pioneer receiver with it's dedicated subwoofer-out was a no-brainer) and then took it for a spin. Put in some Loreena McKennitt with some standard hard-hitting, deep bass drum hits and flipped the phase switch back and forth. Then some Muse. Pretty cool, especially for forty bucks.

But what I really am thinking of doing is heaving it over to the studio and plugging it into the G5 Mac and then plugging the M-Audio BX4A's into the sub (taking advantage of its 80Hz high-pass filter on the line-level input to weed out low frequencies from those little 4" drivers) so I can hear some real bass while mixing (especially since my home audio speakers have 10" woofers and put out a lot of bass on their own). That may just suffice for the studio needs rather than plunking down $300-400 for a pair of 8" monitors. Or so goes my thinking ... we'll see.

Or ... we'll have some serious bass for our music and movie soundtracks.

Saturday, February 26, 2011

old mac new life.

So an idea from a post on the totally über-Apple-centric tech blog Unplggd inspired granting an extended life to Julian's now old eMac that Santa gave him when he was six and that he used diligently and dare I say quite expertly - maxing out it's capabilities with Photoshop and GarageBand and thereby earning himself a much peppier and newer iMac. I've bothered myself setting it up (doing a clean install of 10.4.11 to get rid of all Julian's old stuff etc.) and getting an Airport card (didn't do my homework first to discover it is only 401b - not g - so fairly useless but I was only out fifteen bucks) followed by USB bluetooth and 401b/g wi-fi adaptors. And putting to good use the first pair of Apple bluetooth mouse and keyboard since I splurged and upgraded to the newer versions for the Mini setup in the living room -

I've bothered myself with all of that but I'm not convinced how long that 700MHz eMac will sit there (since it's a CRT the screen garbles when the microwave kicks in and it's kind of slow and clunky) - but if we get used to having a handy Mac in the kitchen to stream our iTunes, look up recipes, have our to-do and lists for the store and the constant NOAA forecast and widget games like Sudoku and the NASA image of the day I may have to hook us up with a newer 17" G5 iMac or built-in Mac Mini ... we'll see.

---

And just FYI the online article from Ready Made magazine talks about what it takes to make that Mac Mini built-in.

reality check.

I dunno. Maybe it was the fact North Tacoma got more snow than us and it still lingered in the streets and the lawns and rooftops. The sidewalks unshoveled a guy carrying his groceries on his way home trying not to slip. A view north to Puget Sound. To the west the Olympics. To the east Rainier and the Cascades. House after house after gorgeous Craftsman house. Look at that one over there with the steps leading up from the sidewalk and then more steps up to the front porch!

I used to live there afterall, and it still pulls me back with a definite force - in North Tacoma amongst the alleys and the streets lined with maples Union and North 30th I feel at home. I'd walk to UPS to find an empty practice room long before the Bechstein just to play a bit. Take Julian to the parks. Walks alone down from North 46th to the water along Ruston Way. Saturday afternoons and some weeknights spent toiling at the Mountaineers building learning the ropes of climbing (yeah, haha) and meeting a guy named Matthew with whom I've climbed more or less exclusively since those days ten years ago. The little toy store off Proctor and 26th. Yard sales every summer driving mad-crazy around streets I still remember better than I do around my own house now.

So anyway driving through this afternoon jealous of the snow and the alleys and the streets lined with maple trees and icy sidewalks I was reminded how I ultimately want to live there in a small bungalow with alley access and this Bechstein once Julian has graduated high school and gone off on his own and I no longer have any ties here. So the point I guess at least the point for writing this up here is that I think I need the reality check while I plan out what I am going to all do to this place. Spend a few grand to remodel a disgusting and dated (and well now gutted) bathroom ... okay. Gut the entire back of the house to put in my dream kitchen ... reality check. Maybe not. Maybe just get around to upgrading the appliances and put in a real stone floor maybe some new cabinet door fronts to match more the paneling above the fireplace. Tear down all the remaining lath and plaster in the living room and Julian's bedroom for sheetrock ... no way. The walls are fine the way they are. Install paneling all around the living room ... maybe. Probably not. Hang casing and a crown molding around all the ceilngs ... definitely. I already bought all the solid fir doors so that's OK and I really like the nice antique door knobs like I already got for the bathroom but I'll miss them when I move into another house in North Tacoma no doubt not perfect like I planned on making this place so will take more work.

A neverending process.

But it's good to be reminded. I never planned on living here forever off this pretty busy street. I've always wanted to eventually settle in North Tacoma. So just need to keep that in mind before plunking down thousands of dollars or investing hundreds of hours. I still want to do most of what I had and have in mind but there will no doubt be some things that get scrapped or downgraded from such ambitious plans now with this always in the back of my head.

And I wish it had snowed more here and it was still sticking to sidewalks and rooftops.

Sunday, February 20, 2011

fireplace part two.

Okay, so apparently like just about every project I've ever done somewhere along the way I got a groove and figured out what I was doing cos it only took about an hour today to finish up building the other half of the paneling - go figure -

Now I just have to caulk and spackle the staples, prime a couple more things (uhh, those two vertical slats that aren't primed are because I'm retarded and I routed the side that was primed - oops) and then paint it and it'll be done. Oh, and paint the bricks which shouldn't be bad. Then rip out the ceramic tiles that make up the hearth now and put in some slate ones.

Oh, and I found a photo of the original beadboard molding pre-me tearing it off -

I have to say I like mine better. And even back then I had gotten a bunch of slate tiles to see how they'd work (they're in the photo lying on top of the ceramic ones) so apparently I'm still going with that. I wonder if I still have those or did I return them ... ?

Saturday, February 19, 2011

fireplace part one.

Let me just start off by admitting I said to myself at like one o'clock or something a couple Saturdays ago 'oh, I'll just knock this fireplace paneling out this afternoon.'

Uhh.

Yeah. No.

Two weeks later I am on day three. And ten hours later on this third day ... I finally finish, but only half-finished.

So it's somewhat embarrassing, but this is how the fireplace has looked since I ripped off the beadboard paneling about a month or two after moving in here four years ago -

So clearly I underestimated, well, how hard this project would be. I've already sworn way too much and I'm only half done. This is way harder than I ever imagined.

First thing to do was to build a frame on which to attach the paneling. Ugh. This is what was tough. Probably the hardest part - trying to attach 1x4 framing boards to an unsquare, lopsided old lath and plaster-covered fireplace. Ugh again. But after two days of nailing (and, yeah, swearing) I finally finished it -


Let me just say this whole thing has been all about drywall shims. Lots and lots of drywall shims. To make everything square, that is. Or at least try. Behind the framing. And again behind the final panels and slats to make sure everything was tight and square.

The other thing I of course had to do was prime all the wood. And do a lot of routing. A lot of routing -

I set the 5/8" bit to the depth (or, rather, height) of the thin plywood I picked up at Lowe's for something like $10 for a 4x8 sheet. The pieces of plywood would then slide into the router grooves when I started putting it together.

And lots of mitering. On the table saw and the chop saw. I wanted mitered corners, afterall. What I still love and appreciate about that Dewalt saw is how precise it is - the key being a tip I read a while back about miters: make sure to flip the saw 90º when mitering a corner instead of just flipping the wood around. That way if the saw's 45º is actually, say, 43.9º - if you just flip the wood the two cuts won't add up to 90º. But if you flip the whole saw, the other cut would be 46.1º and the two will fit perfectly together. So making sure to do that, the first corner looked beautiful -

and I was off to a good start. No carpenter am I, though.

I had to miter the long corner vertical slats on the table saw, but they came out looking pretty good, too (yes, surprisingly). Then - with lots (and lots) of meticulous cutting (i.e. back and forth to the saw I carried out to the front porch to shave off a sliver of an end to get each slat to squeeze into place and ensure a nice, square, tight fit) I started putting the first side together -

To get the vertical slat to contour to the wall, I used a stack of shims that molded to fit the slant of the wall and traced the outline on the wood, then free-cut it with a circ saw. The thin plywood then just slid in the router grooves -

Note the different depths of wood - that was key for me - using 1x stuff for the horizontal top and bottom pieces, then 1/2x stuff for the vertical slats and then the plywood paneling for a total of three different depths that add contrast when the light hits them. And so a cross-section looked like this -

And then ... the first side was finished -

It was sort of like doing a puzzle - the way I was building it meant each piece had to go in a certain way. Or rather, a certain order. Vertical slat. Then slide in the plywood. Then horizontal slot and slide in another piece of plywood. I made a mistake of putting in a second vertical slat before sliding in the plywood so had to take it off. Which wasn't easy - I was using my stapler and let me just say - those staples hold really, really (no - really) well.

Obligatory in-action shot of course -

And then ... and then two panels were done on the front -

Of course that beam isn't centered, either (hey, it's an old house). So I opted to make it look centered - uhh, I mean making each panel width unequal in order to place the middle vertical slat in the middle of the beam, which isn't in the middle of the fireplace (get it?). But that's where I had to stop. After ten hours. And probably another twelve at least between all the routing and priming and trying to install a square frame for nailing. Sheesh. An afternoon haha.

I'm not making any bets on how long it will be to finish it. At least a couple more days. Have to finish the other half of the paneling and then caulk the edges and paint it all. Then paint the fireplace bricks. Then install a slate hearth. We'll see. But despite it being really tough, it's (slowly, very slowly) turning out.

Monday, February 7, 2011

it's all a question of balance.

Or so David Helfgott's piano professor told him when describing his playing of Rachmaninov's piano concerto in D minor.

In this case, though ... uhh, white balance. As in - for matching paint swatches.

All because of the shot I (*ahem*) Photoshopped the wall colour in I decided I would paint just that corner of my living room. Afterall - I was going to be looking at it while I worked so I might as well not stare at a boring white wall waiting for me to actually remodel this living room for real.

So I trucked up to Lowe's to blow twenty bucks on a gallon of Olympic flat paint matched to the beautiful Benjamin Moore HC-85 fairview taupe (the colour I've had picked out for the living room for at least three years). Got home and started cutting in around the window by the Bechstein.

Hmm ... it was too red. That's weird - I'd never had a problem with Lowe's matching Olympic paints to my Benjamin Moore Historic Collection swatches. But the gal that mixed the paint hadn't exuded confidence - hers or mine. And I hate to be 'that guy' but in this case (like I did for the stain I had mixed for the cedar shakes) - I opted to take it back and ask for it to be remixed.

Uh-oh - same girl. Yikes.

Well, this time I watched her go through the screens and when she got to white balance I noticed she picked 'incandescent.' I also noticed there were other options - including 'daylight.' Now the first can was too red compared to the swatch - i.e. too warm. So I asked - why incandescent when all the lights over the swatch areas were daylight-balanced (well, supposed to be was more like it - some were closer than others and every booth had a slightly different temperature but this was Lowe's afterall)? She told me that's what they had told her to do. I sorta wondered if she even knew the difference but quick tossed that aside to settling the task at hand.

OK - could you please go with daylight? I don't really care if the paint matches some incandescent colour temperature - I want it to match in the, you know, daylight. So she did. And it matched the swatch perfectly. And now I know what to ask for the next time I have Lowe's mix up paint for me.

So anyway - with nothing better to do then on a Saturday I figured why not paint that corner?

And, uhh - as long as I was at it - in my typical fashion then why not just paint, well, the rest of the walls?

And Julian - so cute and naîve asked 'so why don't you tape around all the trim?' To which I modestly replied 'taping is for amateurs' (haha).

So then ... something like five or six hours later (with the help of Katie - who meticulously painted the five window stops and a couple of patches on the baseboards where there once were lame baseboard heaters I had ripped out long ago) my living room was painted (granted, these pics were taken the following day, i.e. today and I finished with barely an ounce of paint left to spare) -


Now - since I've gone and started - I have to finish ... the fireplace. I'll re-paint the brick next, then quick throw together some paneling above that I sketched out this afternoon (using a router - I need to remember more often that I have that handy power tool - like, for mortising the doors and to fix the trim in the guest bath) -

And once that's finished - it'd be nice to get the bedroom doors swapped out with the beautiful solid fir 5-panel shakers I have waiting in the wings. Oh - and the front door.

Just like everything - some vast project started cos of one little thing ... good times.