After making the classic mistake of ordering (and framing in) the wrong tub, we received the correct one a week ago or so. This is the most important part of the bathroom remodel, so it was time to fix my mistake and get it installed.
I needed to make up 4" in the space we framed for the tub, so between Home Depot and Lowe's, I was able to get what I needed: a stack of 2x2s (1-1/2") and 2x3s (2-1/2"). Today, Scott and I 'scabbed' them onto the framing we installed back in August - 2x3s on the plumbing side...
And 2x2s on the built-in cabinet/shelf side...
Then we dry-fit the tub to make sure it was good -
Boom. It fit. Time to install the drain -
Had to dry-fit the PVC pipe to measure, then cut it to length. Overflow and drain installed to the tub. Now time to take a look at the drain under the subfloor...
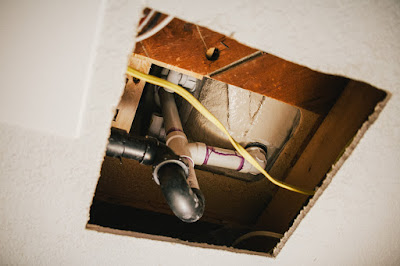
I thought I'd actually be able to use the glued section of the P-trap left from the old tub, and just take off the slip joint for the trap and use the new one I had bought. The thing is, apparently in 1980-whenever that slip joint was roughly 1/16" smaller, so... the new one didn't fit. I ended up having to cut off the ABS (slowly, it was a little tight with the saw under the floor between the joists... ) and glue a coupler to the existing pipe, then a short section to line up the trap where the drain would be from the tub. To make it a little easier, I opted to saw an 11" square hole in the basement ceiling (still, why did anyone install sheetrock on the basement ceiling!) to access the drain and make sure it all fit (I'd cover it up with an access panel) -
But it did... all fit, that is. Phwew. Knowing it did, we heaved it back out, then I went to work mixing up the mortar. We first laid 2-mil sheeting on the subfloor, then dumped the mortar onto it and spread it around -
Finally, we lifted the tub into place for (hopefully) the last time (then proceeded to jump up and down inside it to make sure it fit). We had scribed pencil lines on the joists for where the tub flange was before setting it in the mortar, so we'd know where it needed to rest. It all looked good, and was level -
Kohler's instructions were, in typical fashion, really lame. Here, Scott tries to make sense of them...
They mentioned how the motor should rest directly on the subfloor but, uhh, that wasn't actually possible (that plywood it's sitting on is part of the tub base) -
So hopefully that's ok and it isn't going to be terribly noisy. We'll test it before hanging the cement board and sheetrock...
Lastly, we nailed up 1/4" furring strips I had gotten at Lowes -
Only to find out 1/4" (despite that being what the ol' instructions called for) weren't thick enough - the tub flange was thicker than apparently it should have been. So I looked up in the garage and found two full sheets of 1/2" (well, technically 7/16") plywood, then broke out the table saw so we could rip 1-1/2"-wide strips to use for furring. I'll return the cedar ones to Lowe's (they were kind of expensive). Better to be scrappy, afterall - they're just strips of wood that will never be seen.
After we ate homemade pizza for dinner (that's the price we paid for Scott's help heh) and he left, I took a circular saw to the original framing to make room for the built-in cabinet that I'll build this coming week, as well as installed the framing for the built-in shower shelves. I mis-measured one of them (12-1/2" instead of 12-3/4", even though I had clearly written the latter) and mis-cut one of the 2x4s. I thought I was super-clever by using the back of the old vanity for the back of one of the shelves, but I mis-cut it as well and had to redo it.
It was time to be done.
A successful day overall - the framing fixed for the tub, the (correct) tub installed (just need to get the ABS-PVC glue to finish the final fitting), the framing fixed for the built-in cabinet, and the shower stall shelves built. But for some reason it still doesn't feel productive...


No comments:
Post a Comment