
It needs a porch light similar to the one I just installed below. Hmm, undecided though ... If I did it I would do the same thing to the garage.
And ps - the new house numbers are on their way ...


Rejuvenation McKenzie porch light


 So during the couple of years of having an espresso machine I have always hemmed and hawed about whether or not to splurge for a burr grinder. I couldn't ever rationalize it (it's funny what we can rationalize from a spending standpoint ... ) so never got one until I had a build-up of Amazon gift cards and realized that it would only cost me the tax and shipping - I splurged.
 So I finally got around to measuring all the possible swatches for my house (well, the ones I like) using a free utility called i1Share. It measures the L*a*b* values (for non-color geeks those are values as close as possible to what our eyes see) for each swatch and then exports them to a file format that Photoshop can use and that I can grab from when trying different painting options. Go ahead and click on any of these images to see a larger version.
 After probably an hour or so I was finished. So, for example, here's what the channel looks like of everything that is currently painted light brown -
 Everything that is white will be colored whatever I choose while everything that is black will not be affected. And then as a mask (so you can see the rest of the photo) -
 Then it was just a matter of selecting the various channels (and combining multiple ones as needed) and applying a color. So using the palette I measured above, I can just take the eyedropper tool, pick a color from the swatches palette and apply it to any of those masked areas to see what color it will look like.


 I hate plumbing. And I do not like to use that word. 'Hate,' not 'plumbing.' Well, maybe 'plumbing' too. This bathroom sink and faucet were the worst hell I have experienced remodeling my house and it has never worked really. Well, it did for a little bit. Then the cold water supply started leaking from where I had used a compression fitting to attach the rigid supply line to where I had cut off the supply going to the fixture. So I shut it off. No cold water. I do not even want to think about how long ago that was but it was at least a (*cough*) year.

 Then start measuring. And cutting. And measuring some more. And doing some math to figure out what sort of spacing to leave on each end of the vertical 1x4 slats. Which involved breaking out a calculator. Then cutting some more. I just did one to test building it before committing to cutting everything down. Brilliant.
 So I drilled each vertical slat. Twice. On top and bottom. Well, I tested to see if one pocket hole would hold and it was a little flimsy cos the slat could move around so quickly chose to take it up a notch. Then I drilled the underside of each of the ballisters -
 That jig really is awesome and I am serious when I say that I'll get some mileage with it. Pocket holes rule (in this case, it meant no brackets necessary to attach the assembled railing to the posts as well as to attach the slats).
 So I clamped a 1x4 to the 2x4, pre-drilled then screwed in some 2" screws. Then another 1x4 on top of that to make what resembled an I-beam. Then drilled in all the pocket hole screws to attach the slats to that -
 Then Julian wandered out and grabbed the camera to take some shots of me working (apparently - I found these on my camera). Good times -
 I was told to keep this pic for when I am old to look back on. Uhh, so I will.
 It's so much nicer I realized doing this kind of construction instead of furniture cos you can get away with hacks like that to make up for things not working perfectly. And using crappy, cheap lumber cos it's just painted and, well, outside. I have to lop off the top of the post at the exact height I determine and then install a cap that I have to build out of a 1x4, 1x5 and 2x6 (all cut into squares) that will match the caps on the original posts. And then do the other three. Well, I finished installing the other one on the left side of this and built the other two, but held off installing them on the smaller stairs cos I am also replacing all of the stair treads and kicks cos they look like total crap next to brand new railings and they'd be in the way on that set of stairs if I installed them. That and it was 8:00 and it was time to relax, pop in Avatar and eat some pizza.
 I used a satin varnish from the same company that made the stain - making sure to pour the varnish I was using into a separate container as I worked cos it would get slightly contaminated with the stain and this kept the rest of the varnish in the can pristine -
 Once it had a chance to dry, I glued the posts to the headboard and footboard using some clamps -
 Then screwed in the pocket hole screws for good measure -
 Those didn't really matter because the headboard and footboard construction is all just cosmetic - no structural anything about them. But whatever.
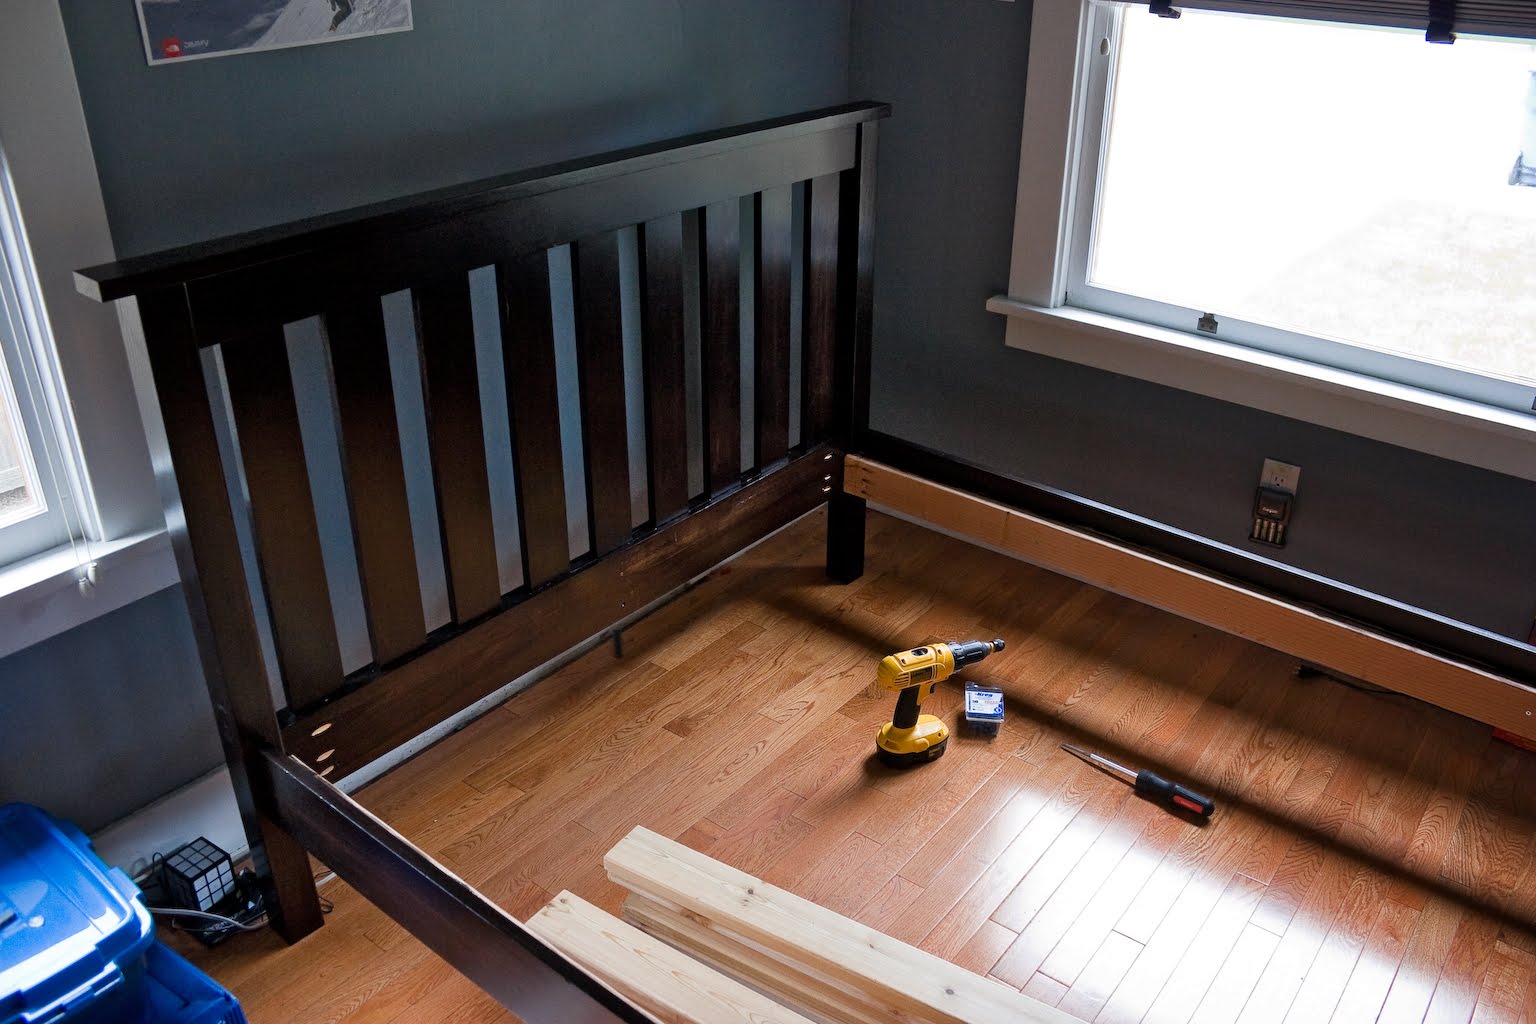 To attach the siderails I cut a 2x4 into two pieces each to the height of the base of the headboard and footboard off the floor (which were the same) and then drilled in the three pocket hole screws on each end. I am still impressed with how strong three pocket hole screws can be - I think I read somewhere on the Kreg site that the strength of a pocket hole joint is somewhere around 700 pounds! The self-tapping screws are sort of the secret and they apparently exert an enormous amount of clamping pressure (compared to about 450 pounds of a mortise and tenon joint). Yeah, with three screws per post this bed is absolutely rock solid.
 Two screws per board to add rigidity to a bed that - with the pocket hole screws and a lot of glue - was already rock solid but now even more so -
 And that was that. I had gone to Sleep Country on Memorial Day to get a mattress and was reminded of how random mattress shopping is. Like in the fact that, well, I had gone to Sears first and thought I'd at least check out another place so headed over to Sleep Country (where I bought my mattress). After being almost attacked by a salesperson it became clear that all they really had in the full size were total crap mattresses that would probably fall apart in two years and then 'luxury' mattresses that didn't seem to really fit for a ten year old. But I eyed one that I really liked even though it was about two hundred dollars more than what I surmised was a comparable mattress at Sears. So I told the salesperson this and she nearly-instantly said she could not only match the price I spewed out with absolutely no proof (it was the truth of course) but that she could beat it by 5%. Sold! And it really is a nice mattress - my goal being that Julian will take it with him when he moves out (along with the bed) cos both will have stood the test of time. Well, that was the goal anyway.
 Some organic sheets from Target (which are really actually super-soft and were cheap) and a quilt that I found at a random garage sale when I was back in Missouri a few weeks ago that Kathy was kind enough to mail rounded it all out. Then Julian had to try it out -
 The next step is to totally super-duper clean his room (and take the quilt to the laundromat's ginormous washers) and then I'll try to take a real photo of it to post to the knockoffwood bragging wall.
 I used some scrap 1x4 trim from the stuff I tore out of the laundry room to hold them level after making sure they were with my trusty 4' level. Easy peasy. Then did the same things for the front staircase -
 The design will match the existing porch railings which are built out of 2x4s and 1x4s (it was the realization of how simple the design was that prompted me to say I can build that!) and the only conundrum is the fact I do not want to paint the new railings the ugly tan/brown combo so I'm not sure how to deal with that. I'll have to revisit this photo and see what color scheme to use - likely the vertical 1x4s will be a contrasting color and everything else will be painted white. So it won't match - for now. Oh well.