Sunday, May 20, 2012

jig.


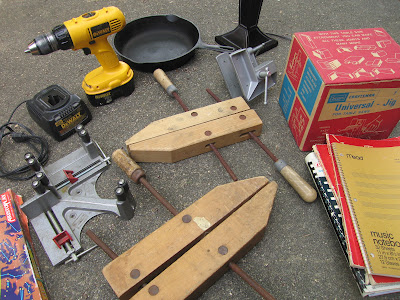
So ... a three dollar jig at a garage sale. Well - that and a couple bucks each for some corner clamps (for putting together drawers - and picture frames - another project of mine waiting in the wings cos solid hardwood frames - especially big ones - are expensive ... ).

Based on how much I've been enjoying putting together this little bookshelf I have been giving much more thought to building myself a dresser. I've - uhh - never owned one personally. I kind of forget what it's like to store clothes in drawers.

But honestly - part of that is a) my pickiness and b) my cheapness. I want an heirloom dresser that I will buy once and still have to pass on to Julian so-to-speak. But I haven't found anything that's not close to two grand that fits my taste and that other criteria.

Enter the idea of building my own ...

Now I get that building a dresser will be tough - it will require precision that I have yet not really had to worry about building a bed and this bookshelf. But it doesn't seem as undoable as maybe I once thought. And of course the benefit - besides really enjoying working with wood and building stuff - is I can a) design it exactly how I want it and b) can do it for way way cheaper than buying one.

Like - I want cedar-lined drawers. Hard to find sub-two-grand but to include it in my design - no problem!  I want a drawer taller than the others to house my wool sweaters cos wool sweaters rule. Buying a dresser you're stuck with someone else's idea of drawer quantity and dimensions ... not if I design my own!

And so on.

It will be a couple notches up on the scale of complexity - but in the end - it's not rocket science. And if it's not perfect ... it'll just have character.

So that three-dollar jig - for mortise and tenon joinery - may be what I needed to get me pumped to design and build a dresser right on the heels of finishing the bookshelf.

yard sale season 2012.

This past Saturday was the official kick off of the 2012 yard sale season with (duh) the Lakeland Hills community sales. I often joke that abomination-of-a-development has it's own government and armed forces and such - but one Saturday a year in May I brave beige-coloured-house-hell and we pile into Stuart to see what we may find.

And this year ... this year was all about supplies for my growing wood shop.


A couple of nice wood handscrew clamps ($5 each) and a couple different corner clamps ($3 each or something I think) - those will come in handy if I am going to be building drawers. Just sayin' ... And a table saw jig for joinery (more on that three-dollar find in a bit). Oh - and the big spend ... $35 for a Dewalt 18-volt drill driver and charger (I blew one-fifty on mine - but now I can keep one in the garage and another in the house I guess - yeah ... ).

And then some random stuff -


Yep - some game for $2 called Constellation Station! For three bucks - the base for a craftsman table lamp (now just to find an art glass square shade - sort of like this). A cast iron skillet for fifty cents or something and some miscellaneous piano books for J (good ol' John Thompson!).

Not a bad morning - after going to the farmer's market here in town and getting coffee of course. Yard sales rule - looking forward to many more finds.

ps - something I really would love to find would be a vintage, industrial wall-mounted task light (I know I said wall-mounted - but they're hard to find) - like a for-real one - not an over-priced Rejuvenation replication (or one their buyers have found likely at a yard sale and are selling for eight hundred bucks) ...

bookshelf finishing.

So now I'm up to putting on the stain and varnish. Definitely learned some things from J's bed (like have a plan on how much to assemble before staining - too little would make assembly tough if not impossible - but too much makes staining more difficult and potentially sloppy-looking). I ended up trading in the rosewood stain for a slightly-less-red-slightly-more-orange black cherry.


It is beautiful. And just about matches the coffee table.

And another thing different this go around ... I felt it when I botched up the top piece by over belt-sanding it ... but no worries - it added character and made it look a little beat up (uhh, the in-vogue term would of course be 'distressed'). But the point that hit me so instead of getting upset made me smile a little to myself - this bookshelf is not mass-produced somewhere by machines. It is hand-made. By me. And so all the little imperfections - in the assembly - in the finishing - I have already begun to cherish. That's character.

And I'm cherishing the whole hand process - like not rushing through it but enjoying the moments. The delicate hand sanding to the edges. Putting on the stain by hand of course and then rubbing it off with old torn t-shirts of mine.


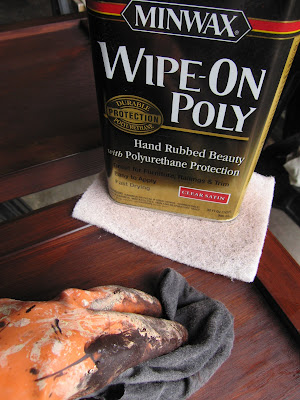
And the best part I've found ... rubbing on the Minwax poly.


On J's bed I used General Finishes (the same brand stain I've used on both now) poly acrylic that I applied - like the stain - with a foam brush. It did the trick and - while nothing really wrong with it - there is something special about soaking an old t-shirt and hand-rubbing in the poly. How it brings out the beautiful orange tones and warmth of the stain while the satin finish gives the piece just a hint of a subtle gloss -


So the shelves are already done (3 coats of the poly) and the two sides and back are drying out in the garage while today it pours rain after probably two weeks of unseasonably sunny-for-Springtime-in-the-northwest.

But one thing I forgot to mention - last weekend at Mclendon's after Katie pieced together an adorable planter of ground cover for her mum's day I went to pick out some hemlock lattice on a whim. The idea ending up being this -


Adding a touch of arts and crafts-slash-mission styling to the shelf for about twenty bucks. I ended up staining and varnishing the lattice trim separately and will glue it on once the sides have three coats of varnish themselves - part of that balance of how much to assemble before finishing. The only catch will be making sure the glue doesn't eek out ... but that'll be part of the whole assembly gig that I should be up to doing within the week.

Overall - I am having a grand time building this shelf and am really starting to enjoy woodworking. Maybe I'll build a dresser afterall ...

Friday, May 11, 2012

bookshelf finishing test.

So just wanted to test the wood conditioner and stain combination and see how it was going to look on the luan-veneered plywood and VG fir before I go to town this weekend and finish this thing (well - it'll take a week to put on the 4-5 coats of varnish - so it'll just be the stain this weekend).

Exhibit A -


I had some of the Zinsser stuff leftover from when I did J's bed + some Minwax stuff from I have no idea ... so I thought what the heck - since I had both of them why not see if there was a difference.

On the left obviously is the Minwax. On the right - the SealCoat. Hmm - the SealCoat is pure crap. The Minwax stuff is about 3.6 billion times better. Oh - and on the far left - no conditioner (note how the wood grain has pretty much disappeared ... so that's no good - duh).


Holy cow that's gorgeous. It's General Finishes Rosewood water-based stain that I picked up at the local woodworking shop the next town over. Tomorrow I'll test what a second coat looks like - but with that + 4-5 coats of satin varnish I am definitely excited to see how this bookshelf turns out ...


(close-up of the lousy SealCoat results ... )

Oh - and the other day I finished assembling all the pieces, routing the top and the final sanding so everything is ready to go ... supposed to be gorgeous out this weekend - perfect time to put on some music and stain away!


Monday, May 7, 2012

furniture building ... take two part two.

So moving on with building this little bookshelf ... I had left off with having glued the plywood sheets together.

Note to self: use more glue when laminating plywood. Lots more glue.

But after cutting everything down and reglueing some sheets I moved on to planing. Then more cutting. Took 5º off the bottom 4" of each leg by using a jig I had made a long time ago for my chop saw -


Then - in order to cut down the lengths wider than 2' (the widest cut possible on Katie's dad's table saw - a full foot more than mine) - I splurged $18 at Lowe's for a 100" circ saw guide. Best $18 I ever I spent. Seriously. This thing rocked the party -


I would use my drywall square and butt the guide up against it to make sure everything was nice and - well - square. Then clamped it down. Worked like a charm.


(It came with the guide - which could be halved into two 50" sections for shorter cuts - and the two C-clamps)

Then I had my 1-1/4"-thick top that I was 'veneering' the edges with 1x2" fir that I had planed to a width of 1-1/4" -


So I glued those around the front and sides -


My longest clamps are 24" so I had to get creative with the glueing options ... it worked is all I can say. And then - to even the little bits up that weren't perfectly smooth with the plywood - I used my new best friend to get the job done -


But no - I didn't even pay $5.00 like the sticker says - the guy I bought my table saw from at a garage sale just gave me the belt sander. I did have to get a new 80-grit belt for it but it works like a champ. Then some good old fashioned orbital sanding -


Followed by some hand sanding on all the pieces (including the legs as shown here) -


I even broke out a 3/4" chisel and added some knicks and stuff on the edges of the shelfs here and there - I may still 'distress' the wood a little more. But then - finally - time for assembly ...

Like I mentioned - this will involve lots of pocket holes so off I went (I did splurge for the 3" Kreg face clamp to help speed things up a bit) -


In order to screw the legs on I used my 24" clamps and secured them in place before drilling in the screws -


And in short order - the first side was done -


This is going to be one solid bookshelf.

Next - the other side. Then the back (just the 2x2 on top and bottom). Then ... finishing all the pieces before final assembly. We'll see how that goes ... it'll be interesting.