Monday, November 25, 2013

plywood crafting.

When Jeff and I were on our annual autumn holiday - this year visiting Grand Teton and Yellowstone National Parks (luckily just days before the bleeping shutdown) - I made him stop at a kitchy corner gift shop in Jackson cos I noticed a really really awesome sign hanging in the window. Jeff didn't bother himself with actually accompanying me inside (I think sometimes it's cool to be a kitchy tourist!) so I went in alone to check it out. It was made out of plywood and plastered with an infamous Muir quote ~

'The mountains are calling and I must go'

There was another - even bigger - sign that said even more simply ~

'Go climb a mountain'

I had to have them. Trouble was - they'd be hard to fit in my carryon luggage. And they were kind of stupid-tourist expensive. So I told myself - 'I can make that!'

Time then to put that theory to the test... It started with buying some cheap CDX plywood and designing a file to size.


Then printing out a set of the letters - as many as could fit on each letter-sized piece of stick-on label paper I had. That was the easy part. Then came the painstaking cutting out part. Of every letter. Which actually wasn't too bad - especially with help!


Then sticking them on - using guides in the design layout and a T-square on the plywood to measure the leading and kerning.


Until it was finished...


Wait... obviously I had painted the plywood white before I began. So then it was time to paint over the letters.


And... the real painstaking part. No... the really painstaking part. Peeling them off. Every. Single. Letter. Oh and the teeny-tiny hyphen. Stupid hyphen.


My fail was that I used regular old Avery label paper (8-1/2x11" sheets granted) cos I had some lying around - but which do not take to being painted over very kindly. And so it was nearly impossible to get them off. Before I make more of these kinds of plywood signs I need to invest in some proper vinyl sticker sheets. But regardless - a couple hours later it was actually finished -


And looks pretty cool I must admit. I have to saw off an inch from the bottom (for some reason I cut it at 16-1/2" instead of 15-1/2" cos clearly I have yet to learn the ol' adage 'measure twice cut once' rule from grade school carpentry... ).

But once I master that - up next...


: )

antique store goldmine.

So on a layover to the ocean in Port Angeles we dropped in an antique store to see what treasures we may find. Besides picking up a few more glass insulators for a buck each (everything was fifty-percent off cos the old man was wrapping up his business to retire and devote his time to woodworking) - we found some absolutely incredible things for anywhere between a couple to at most ten bucks each.


There are the glass insulators in the foreground - I'm planning on building a pendant light fixture for above this dining table that uses them, some cloth-covered cord, 2x4s and Edison bulbs - but more on that later...


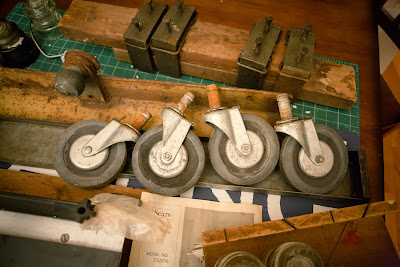
Then these awesome casters that I figure I can use to build some sort of table - a coffee table, sofa table or maybe a new entertainment-type-center thing.


A cool solid rock maple (like the wood they use to make piano pin blocks) miter saw box that I'll probably use to make some sort of spice rack or key hanger or something... I've no idea but it was cool and a buck or two.


Ooh and this gem! A dovetail jig! I've been thinking of getting one of these for a while now - and I'll need it to build a dresser. This one cost I think ten bucks...


Then these random metal things - a bracket that looks like it's meant to encase a 1x4 and some sort of iron tow hitch... I'll probably take off the hitch ball but the iron bracket will make part of a really bloody awesome shelf. And the metal flange thing will look cool on a 4x4 or something also as a shelf perhaps. Metal details on wood are awesome and hard to come by.

Speaking of... the absolutely COOLEST find...


This set of four cast iron 2x4 clamps!!! These things are the coolest things I have ever scored - immediately I knew they would make this glass insulator pendant thing a million times cooler!


I was planning on building the pendant with a distressed, stained 4x4 but upon finding these the plans have changed - I'll use two old 2x4s instead held together on each end with one of these cast iron clamps. The 2x4s will have to be found at a salvage lot but shouldn't be too difficult. I'll write up more about it once I really get going on it (so far we just tested by drilling 3/8" holes through the tops of the insulators with a diamond hole saw bit).

Anyway - sad that this little store is going out of business but I'll always remember these awesome finds - now to get to work finalizing the plans for the pendant and dreaming up what to do with the other iron and metal things.